By: The Andis Staff
In any veterinary clinic, patient comfort is always a top priority. While clippers may not be the first tool that comes to mind when thinking about patient care, they play a much larger role than many realize. Because clippers are used multiple times a day, during surgical prep, diagnostics, grooming needs, and routine appointments, their quality directly impacts efficiency, patient comfort, and overall clinical outcomes.
The Importance of Choosing a Reliable, High Quality Clipper
Selecting a dependable clipper from a trusted brand is essential. Busy clinics don’t have time to troubleshoot malfunctioning equipment or search for an alternate clipper mid procedure. A tool that works every time you pick it up saves time, reduces stress, and supports consistent patient care.
Established brands also offer additional benefits, including:
- Reliable customer support when issues arise.
- Availability of replacement parts, ensuring your investment lasts.
- High quality, replaceable blades that maintain performance over time.
While the upfront cost of a professional grade clipper, often around $300, may cause some sticker shock, it’s a worthwhile investment. Cheaper $30 online clippers may seem appealing, but they typically only perform one specific task, struggle with thicker coats, and burn out quickly. When you consider longevity, performance, and versatility, a durable professional clipper is the better long term choice for both the clinic and the patient.
Maintaining Your Clippers for Longevity and Patient Safety
Once you’ve invested in a quality clipper or trimmer, proper maintenance is crucial. Good care not only extends the life of your equipment but also protects patients from unnecessary discomfort such as clipper burn, pulling, or uneven clipping.
Key maintenance steps include:
1. Disinfecting Blades
Blades should be disinfected between patients using chlorhexidine, alcohol, or a disinfectant spray such as Cool Care. Ensure blades remain in contact with the solution for the recommended time to achieve proper disinfection.
2. Oiling the Blades
Oiling rehydrates the steel and reduces friction between the upper and lower blade surfaces. Less friction means less heat and less risk of clipper burn.
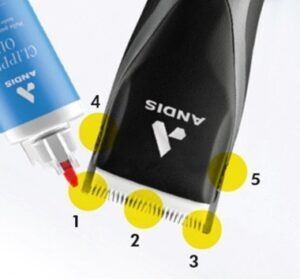
To oil correctly:
- Turn the clipper on and hold the blade facing downward.
- Apply a drop of oil to each corner and one in the center.
- Turn the clipper off and wipe away any excess oil.
Your blade is now ready for the next patient.
3. Evaluating Blade Performance
If blades begin dragging, nicking patients, or heating up quickly, even after routine maintenance, it may be time to replace the blade, send it to a reputable sharpener, or replace the cutter.
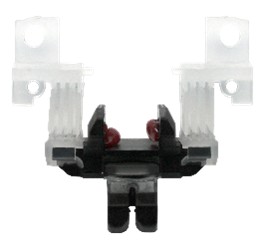 Replacing the Blade Drive: A Critical but Often Forgotten Step
Most professional clipper brands include a replaceable blade drive this component is responsible for moving the blade. These should be replaced every 3–6 months, depending on use. A worn blade drive leads to poor cutting performance (even with new blades) and forces the motor to work harder, shortening the clipper’s lifespan.
Making the Right Investment for Your Clinic and Patients
Before your clinic purchases their next set of clippers, take time to assess your clinic’s needs and the types of clipping your team performs daily. Choose a clipper that can handle a wide variety of coat types and medical scenarios and then protect that investment with proper maintenance.
High quality clippers do more than last longer they support smoother workflow, reduce stress on your staff, and ensure a more comfortable experience for every patient who walks through your door.
Looking for more clinic education around clipper care and maintenance or possibly even some help selecting a clipper that meets your team’s needs, feel free to reach out to Andis Customer Support.